November 13, 2016

Bandsaw Project: Business Card Holder


We had first table at craft show this past weekend in downtown Mesa, AZ.  We knew that we needed several things for the table, among them a business card holder.  Rather than buy one (or two), we (being crafty such as we are) decided to make them instead.

This was a very simple project using the ShopSmith bandsaw, but it was a lot of fun, as Samantha (Crafty) was actually out in the shop with me, even though power tools were running.  I had a lot fun showing her some the basics of the bandsaw, and even got her to give it try!  Fun fact, she enjoyed it!  So, there might be more bandsaw projects in the future made by her!

Not much of a write up necessary for this video, as it's all pretty simple, but below is the video of the process we used for making these fun, rustic business card holders. 


Since I had everything set up, and we had a nice piece of wood to work from, I also cut some wooden disks to use as price tags for the table.

Could double as a small coaster

The price is puzzling...

How much is this puzzle?!
The show itself turned out to be pretty successful, so there will be several new projects with videos soon.  This first outing was mostly jewelry, soaps, and lotions, with some fiber crafts, but I think some wood articles will do well.  I'll find out next month!

October 28, 2016

The Thin (Not) Red Line: Sharpening

It's been a while since my last post, and for that I do apologize to those of you who have been stopping by to see if there's anything new.  Thank you, though, for continuing to check in!

Life has been incredibly weird the last several weeks, and while I've been getting some shop time, I have not been able to sit down and do all the after-shop work. 

I'm enjoying the video format, as it is just so much easier to show what I'm doing rather than trying to take some pictures before/after a cut, and then write about it.  That being said, this video ended up being fairly long, coming in at just about 30 minutes.  That might be too long, but I'm trying to be thorough.  It's a balancing act. 

I've been pondering the idea of doing 2 or 3 of my old style posts for every video post.  Let me know what you think down in the comments!

Over the last few weeks, I've been grinding a lot of metal with sandpaper glued to a granite counter top.  It has been extremely tedious, but ultimately, incredibly rewarding!

As you know, woodworkers are usually solitary, but we definitely don't exist in a vacuum.  Particularly not without the vast amount of information freely available to us though on-line and print resources.  Part of my anti-vacuum-ness (That's a word now), entails reading and watching the products of Paul Sellers and Marc Spagnuolo, aka The Wood Whisperer.  Specifically, I've been reading Essential Woodworking Handtools (Sellers) as well as Hybrid Woodworking (Spagnuolo).  These are amazing books, and I highly recommend either/both of them to anyone interested in getting into woodworking.  Both of them also produce incredibly high quality videos that really bring their written works into a whole new light.  Being thusly inspired, I set about preparing my recently acquired chisels and hand planes.


Make no mistake, this was actually some pretty sweat-heavy work. 

...And today was relatively cool!
 
The single-iron No. 4 Stanley plane that I received from my mother-in-law, needed a LOT of work.  The blade was in pretty decent shape, needing only a small amount of flattening and honing of the bevel.  The sole, on the other hand, was torture.  It was dished badly along its entire length and breadth, and required about 12 total hours of flattening on 60 and 80 grit sandpaper.  All in all, I removed right about 3/32" in order to get in good working order.  While it's a cheap plane, I have to say I was very pleased with the results.  Tuning it is a bit finicky, as the twin screw set works more like a spokeshave than a bench plane, but once it's there, it makes incredibly impressive shavings. 

The vintage planes that I picked up in Prescott, AZ were in overall pretty decent shape.  The plane irons and cap irons had a lot of surface rust, but not much in the way of pitting.  The irons were also mostly flat, so didn't need much rehabilitative work.  The bodies had some surface rust and needed some general cleaning and oiling.  The soles were decent and flattened pretty quickly.  I think altogether I had them cleaned up and ready within about 4 hours total.  Maybe 6.

I had 4 chisels to sharpen (though I only filmed 3), and those went quickly.  Much more quickly in the video!

I was a bit uncertain about my ability to sharpen freehand, and my confidence was undermined further by attempting it with the un-filmed chisel which is some strange beast that I picked up a few years ago at the Big Orange Store.  I think it's some kind of carpentry chisel from Stanley, but it has a cutting edge at the front (like a normal chisel) and also one side.  This leads to a particularly odd angle on the front bevel, which I just could not wrap my head around.  Thinking that the others might present difficulties as well, I went ahead and picked up a cheap honing guide.  It worked very well, but I have since discovered that freehand sharpening is not difficult if you're not working on something weird.

Now that everything is shaped and sharpened, I'll be switching over to a 3-grit and strop set-up.  I'm pretty sure I've got some scrap leather laying around somewhere, and I have plenty of extra plywood!  Just need some polishing compound, and I'll be all set.  I do have a set of diamond plates on the wish-list, but for the time being, sandpaper will do just fine.

That wraps up my initial adventures in sharpening, and now that I've gotten everything in decent shape, it won't take nearly as much effort to keep it that way.  I also shouldn't have to initialize and/or restore so many items all at once!

As always, I'm really open to feedback.  If there's something you'd like to see, or something you think I could improve, please let me know down in the comments.  Thanks for reading!!

September 25, 2016

Part 4: Learn All The Things!!! Flat Miters and Tapers

I spent the holiday weekend traveling around AZ with my wife, which necessarily removes me from the shop and my computer.  We had an amazing time seeing some of the high country and small towns in northern Arizona, and it was a necessary breath of fresh air from the city that recharged us both.  I foresee many more trips to the Prescott/Jerome/Sedona area in the near future.  I continued on Lesson 2, completing Assignments 8,9, and 10, but ran into some difficulty with my video editing software, and was unable to properly export.  I've since switched to KDENlive, but had to learn how to use that.

A short planter, with some math problems

Wait...I did this already!

Consider this a mitered rip cut.
Assignment 9 was the creation of a tapering jig.  It's slightly different than the one I made a few weeks ago, and frankly, I didn't find it to be as usable, so I skipped this Assignment in favor of the jig I had already completed.  Hooray for over-achievement!

Assignment 8 continues the concepts of Assignment 7, in that it's still basic mitered cross cuts in flat stock; however, this builds on that concept by taking the cut pieces and making a short, tapered planter instead of a frame.  Sort of a 3D application, which is important when considering design elements.  There was another bit of math oddity in this assignment, though, which had me scratching my head for a few minutes, wondering if I was crazy.  In the picture above, the dimensions for the mitered pieces are shown as 8" tall and 8.75" wide; however, following the directions starts with creating 4 8"x8" squares which then have two sides cut on an 85 degree angle.  Since you can't cut wood longer, I concluded this was a typo, but it threw me off for a minute since I'm apparently a little slow sometimes.

Assignment 10 demonstrates a similar concept. Rather than a mitered cross cut, however, it is a mitered rip cut.  This is more conventionally called a taper.  There are many different jigs you can make for cutting tapers, Jay Bates made a really neat one.  It is the second one on this list of table saw jigs. There's another interesting one by Garage Woodworks.  Mine is much more simplistic, but it works well enough.

This video demonstrates the process for both the mitered cross cuts, as well as the tapered rip cuts.


When cutting tapers on opposite sides of a piece of lumber, it's important to remember to double the angle of the jig when cutting the second side.  This is because the board references against what is essentially a modified fence.  When you make your first cut, there's no problem, but if you flip the board over, you're now referencing the cut side against the angle that created it.  This cancels out the angle, so no material will be removed.

This assignment called for four 16" long pieces cut with a 1/2" per 12" taper.  On the taper jig, I have squared reference lines across the top edge of the jig at 12" from the hinge end.  By setting those points 1/2" from each other, I established the correct angle.  I set the fence so that upper left corner of each board just came into contact with the blade when seated in the jig.  After all 4 boards were cut, I doubled the angle on the jig to 1" per 12", then cut the opposing side.

After all the cuts for the the flat miter and tapers were made, I glued and nailed the pieces together making a short and a tall tapered planter (without a bottom at this time).

Short sections ready for glue and nails

Gluing up the tall planter


Stretch and Stumpy!

 Missed what's come before?  Part 1, Part 2, and Part 3 are here!


August 27, 2016

Part 3: Learn All The Things!!! Angular Cuts


The last assignment of Lesson 1 is miter cuts, Part 1 and Part 2 of this series cover the other assignments.  That is, making angular cross cuts across the stock at any desired angle.  As an introduction to this technique, the most common angle of 45-degrees is presented.  Cuts are made to produce a kind of frame.

Each side has two 45-degree miter cuts, which assemble into a rectangular form

In the following video, I run through the process with a couple of different approaches.


Glancing ahead a bit in the lessons, I see that these pieces will be used in future assignments, so I will not be gluing them up at this time.


August 21, 2016

Part 2: Learn All The Things!!! Tongue and Groove Joint

In my last post, I posted my first shop video.  And while it takes a while to edit video footage and put together a project, I am much more likely to get useful imagery to post here.  Therefore, I will be making more video content, even if it takes me just a bit longer to get a post up here.  While I strive to make weekly updates (mostly on Saturdays), I would rather have well documented content that most clearly demonstrates what I am doing.

This week, I continued in Lesson 1 of the self-study course.  Previously, I did assignments 1 - 5.  Assignment 6 instructs in the creation of a tongue and groove joint.


As described, this assignment called for stock 3/4" thick.  Unfortunately, all that I had to hand that was of sufficient dimensions otherwise was 1" thick.  This turned out to be extra educational, as I was forced to also learn how to adapt measurements to achieve the desired result.


I ended up sawing off the tongues and grooves, and repeated this assignment about 6 times (once per side), until the stock was too narrow to safely saw on edge.

Reviewing the video helped me identify some of the trouble I was having (another reason I like video!).  I was using a zero-clearance insert, which you can see sits just a bit below the surface of the main table.  I was measuring blade height to the table surface, and not the insert surface, which for the face cuts on the tongues didn't matter, but for all the cuts with the board on edge, it made a variance in the depth of the cut.

The table may have also been just slightly out of square in relation to the blade, which combined with the raw lumber led to distinct problems in getting good fitting joints.  Guess I need to buy some pre-surfaced boards until I learn about that!

Part 3 now available!

August 6, 2016

Shop Tour!

The big news for today is that we have termites.  We saw some mud tubes yesterday, and the inspector came out today and confirmed subterranean termites.  This took a large portion of the day, and by the time he left, it was way too hot and humid to start anything in the shop.  I will try again tomorrow.

What I was able to do today was a quick shop tour video!!

This is the first video that I've ever made that wasn't just a quick capture on my phone.  I actually used video editing software, Openshot!  I'm not displeased with the result, particularly since I kludged it out at coffee.  While never having used the software before.


Nothing else for now, but if I make it out tomorrow, I will have a supplemental post for the week.


July 30, 2016

Practicum: Application of Skills Part 2

Time got away from me last Sunday, and didn't make it out to the shop again until today.  It's probably a good thing as the tapering jig ended up posing a lot of difficulty, and it alone is nearly an article in and of itself.  Today I made the adjustable stop and the tapering jig, which primarily used rip and cross cuts to complete.

Adjustable stop

Tapering jig
Once again the voice activation on my phone's camera was acting up again, so I didn't get as many pictures as I would like.  I get into a flow when I'm working, and forget to move over to the tripod and snap a shot, or I forget to move the tripod entirely and it's in completely the wrong location.  I'm pondering some different options to bypass this difficulty, but it will be a little bit before I'm able to do anything with them.  Soon!

Adjustable Stop

The adjustable stop is made from 2x4 and 3/4" ply wood.  I "milled" the 2x4 on the table saw, and it's pretty darn close to square.  John Heisz has a really great video demonstrating a good way to do this.  He also has a much more in depth article about the process.


After cutting the side pieces, I placed them loosely to either side of the fence and measured across to determine the length of the top.  Since I have the 520 Pro Fence, the dimensions given in Power Tool Woodworking For Everyone don't work, as they are for much smaller fences.  I ripped some scrap plywood to width, then cut it down to about 5 inches.

Cross cutting the side pieces

Pretty good!

Taking measurements for the top piece

Ripping some plywood to width for the top

Cross cutting to length


I drilled pilot holes for the screws, and then laid out the marks for the threaded T-nut, and used a 1/2" spade bit to drill it out.  I hammered the T-nut into place, and used some scrap wood and c-clamps to finish pressing it down nearly flush with the wood.

Pilot holes drilled, now preparing to drill for the threaded T-nut

Hammer it home!

Hammered into place

Top attached with screws only

Then it was a simple matter of screwing the top on to the sides, and threading in the eye-bolt.

Locking eye-bolt threaded into T-nut

In position!


Tapering Jig

Next I moved my attention to the tapering jig.  I originally planned to use plywood for this jig, but all of my scrap of sufficient size are slightly bowed.  A couple of weeks ago, I got some really nice hard country maple, and thought I'd use that instead.  I only have a small amount, so I ripped and cross cut the two smallest boards.  They were somewhat rough, and one of them was slightly bowed, so I thought I'd try out my jointer.  This was an utter failure.  I'm going to have to read up on jointer functionality and dealing with slightly bowed stock.  I should have stuck with the table saw method.

The piece that was sad
I'll be able to salvage some usable stock from this, but it was not suitable for the jig with the skills and tools I have available.  I dug deep and managed to find a piece of plywood that was in good enough shape, so I used that instead.

 I ripped the stock to width, then cross cut to length. 
Ripping to width
There wasn't much cutting for this project.  Mostly it was hardware.  After cutting the arms, I cut the stop block to size, drilled a 1/4" inch hole through it with a 5/8" counter sink on the bottom to accept the carriage bolt, then glued it to one of the arms taking care to keep it flush with the back edge.

Gluing stop block into place
After the glue dried, I laid the arms end-to-end and positioned the hinge.  I marked the screw positions, and carefully drilled pilot holes, and screwed the hinge in place.  Self-centering bits are definitely a purchase I will make soon!  

Hinge placement
 The cross-tie is made from a small piece of 1/2" plywood that I found in the scrap bin.  Using the plans, I measured and marked a 12"x2" blank for all the cuts and holes.  I used a 1/4" bit to drill the two end holes of the slot, drew some connecting lines, and cut out the rest of the waste with my jig-saw.  I cleaned it up as best as I could with a file, but it's a bit rough.  It works fine, though, so that's good enough for a shop jig!  I then set up the bandsaw and cut the tapers...for the tapering jig...Mhm.

Cross tie in place
I measured 12" down from the hinge end, and made a square mark across both arms, made corresponding marks on the cross-tie at the 1:12, 2:12, 3:12 points.  At full extension, this jig cuts a taper at just under 3.75":12".  It is also much larger than I thought it would be!

Set up at a 3":12" taper
Marks at the 12" point for calibration

In the process of making this jig, I made an unfortunate discovery regarding my cabinet.  While preparing the stop, I needed to bore a 1/4" hole through the center of the wood.  I was going to use the horizontal boring function, but much to my chagrin, the cabinet top stops the table's support tubes from descending far enough to position the table below the level of the drill chuck.  I will have to make some adjustments.

After all is said and done, though, it was a productive day.  I have now finished the 4 jigs that I thought would showcase the skills that I learned in the first five assignments of lesson 1!


July 23, 2016

Practicum: Application of Skills Part 1

I was considering going through all of the assignments in all of the lessons back to back, and posting them consecutively before moving on to any projects.  On further consideration (and the wife's input), I've determined that this would likely get boring quickly.  Not just for me, but also for you, dear readers!  Therefore, I will be going back and forth between skill learning with the assignments in the self-study course, and practical application by making jigs and fixtures from Power Tool Woodworking For Everyone.

This week I looked at tackling two different miter gauge extensions.


Both of these projects use, almost exclusively, the skills I learned and practiced last week.

Unfortunately, I ran into a snag right off the bat.  On Thursday, I finally remembered that I had read on the ShopSmith forums how to fix the orientation of my quill depth dial.  However, upon loosening the setscrew on the spring housing, the tensioning spring unwound.  I didn't think this was a big deal at the time, as re-tensioning the spring takes just a few minutes.  What I didn't know, and found out this morning upon attempting the process, was the that spring had slipped off of the internal pin, and wasn't re-engaging.  I ended up spending almost two hours disassembling the quill feed mechanism, reattaching the spring to the internal pin, then wrestling with that sub-assembly to get it back into the spring housing.

By this time, it was starting to get pretty warm in the shop, and the voice actuator on my camera decided to not work today, so I didn't get as many pictures as I would have liked.

Adjustable Miter Gauge Extension

This is a pretty simple fixture.  I cut down a piece of 3/4" plywood to 3"x15".  Then, using a router, I made a 1/4" wide slot with a 5/8" counter-sunk groove running through the middle of the length that is about 1" from each end.

Set the fence for 3" from inside tooth

Rip to width.  Push sticks are your friend!


As you can see in the final picture, the carriage bolts are recessed from the face of the miter gauge extension, and it can be easily moved across nearly it's entire length.  I like to bring it right up the edge of the blade, so I know exactly where to position my cut line.


Miter Gauge Extension with Sliding Stop

This one took a lot more time than the other gauge, but I really like it!  This thing is a beast!  It's thicker than it should be, as re-sawing plywood is not particularly pretty, and it's tough to joint/plane afterwards.  So I didn't.  It's just under 1.5" think (two layers of 3/4" plywood), but it used every technique I learned last week, which is pretty cool!  I ripped some plywood down to 3" for the back, and two pieces 1.25" for the front track.  I then cross cut each one down to 23".  The two front pieces had a 0.25" x 0.25" rabbet ripped along one edge.  The stop had a 0.25" x 1.25" rabbet cut onto each side.  1/4" holes with 5/8" countersinks were driven in the rear board, and two small 5/8" cut-outs were made in the front  to accommodate the carriage bolts.  The whole thing was then glued up and later assembled.

Cross cutting rear section

Setting up to rip the front pieces

Gluing up the main assembly

Gluing up the sliding stop, I doubled up two pieces of 1/8" hardboard for the internal portion.

Drilling and counter sinking

Assembling the stop

Stop installed in the main assembly

Installed on the miter gauge.  This thing is massive!
All-in-all, this was a good day in the shop.  It started out with a lot of frustration, but I did learn a bit more about my machine, which is cool.  I also finally got my quill depth gauge set up so that I can actually use it without guesswork!  The miter gauge extensions are going to help out tremendously with future projects, and I've been wanting something more substantial than the little 12" extension that came with my machine.  I now have two very useful alternatives!

Part 2 of Practicum.

July 17, 2016

Skill Building: Learn All The Things!!! Part 1

Results from todays lessons
As I mentioned in my cabinet post, having theoretical understanding of a technique is immensely far removed from being able to actually perform that technique.  I learned that there are many skills and techniques that I need to practice on the ShopSmith.  Fortunately, ShopSmith offers a self-study course.  I decided that before moving on to any more actual projects, it would behoove me greatly to go through this course, and learn how to do a lot more with my machine.

The course is broken up into 10 different sections, each of which have several assignments.  I began Lesson 1 today, and made it through the first 5 assignments.  These start off very basic, and get progressively more advanced.
Assignment 1 I actually performed last week (inadvertently).

Already done!  Woo!!!
Ripping lumber
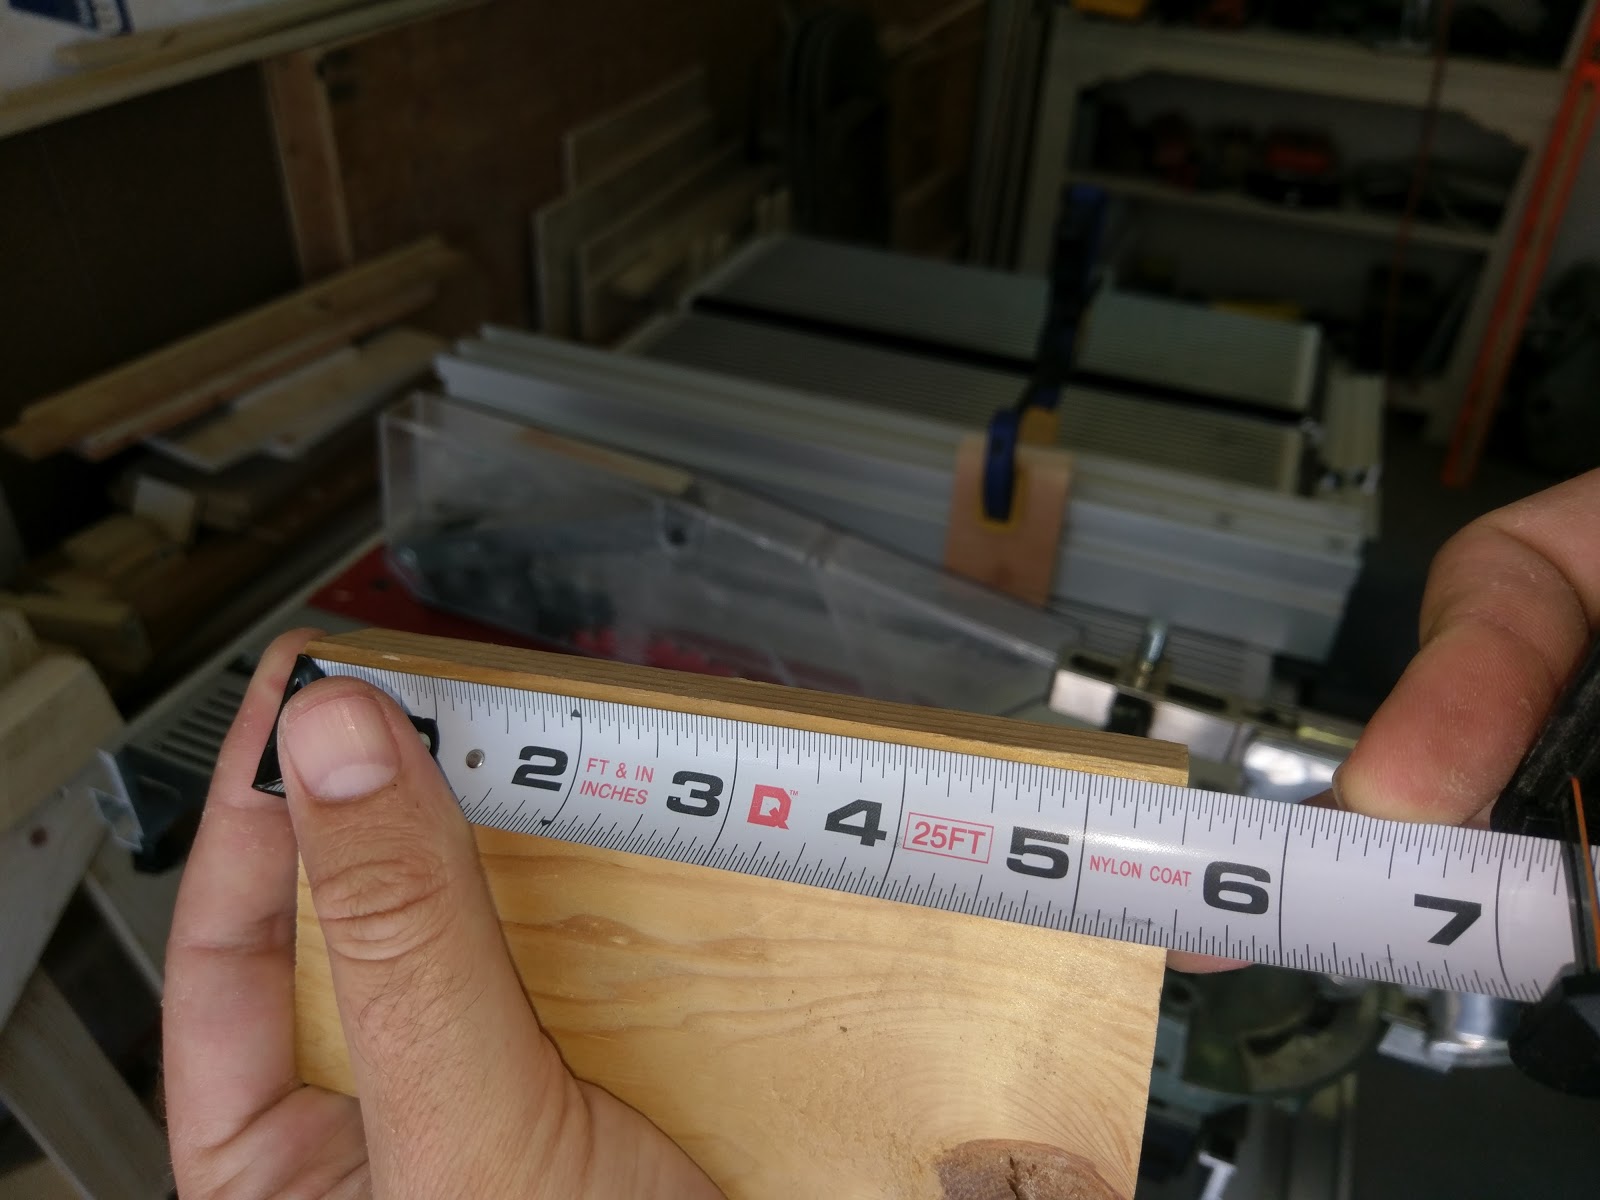
In Assignment 2, you learn a basic rip (with the grain) cut.  Starting with a 3/4" thick board that's 6" wide and 2'-3' long, set your rip fence 4" from the inside tooth of your blade.  Power up the machine, and make just a small nick in the stock to check your measurement.

4" from left edge of board to left edge of nick
With the machine powered off, make any necessary adjustments with either the fence or the quill, and complete the cut.

Off-cut remains on the table while the blade comes to a stop
Assignment 3 is the cross (across the grain) cut.

Cross cutting lumber
Using the 4" wide piece of stock created in Assignment 2, use the miter gauge (set at 90*) to first cut about an inch off of one side, then flip the board end for end.  This keeps the same edge against the face of the miter gauge and will ensure that ends are parallel.

Line it up...

Make the cut
From the freshly cut end, measure 20" and make a squared mark across the width of the board.  With the machine off, line up the cut line so that the blade will cut just above it, removing only waste wood.  Power up the machine and make the cut.

Measure and mark

Align properly with blade

Make the cut

Squared up cut.  The bottom edge was against the miter gauge.
Those are the two basic cuts on a table saw.  Pretty simple, but they are absolutely fundamental.

Crosscutting to equal lengths
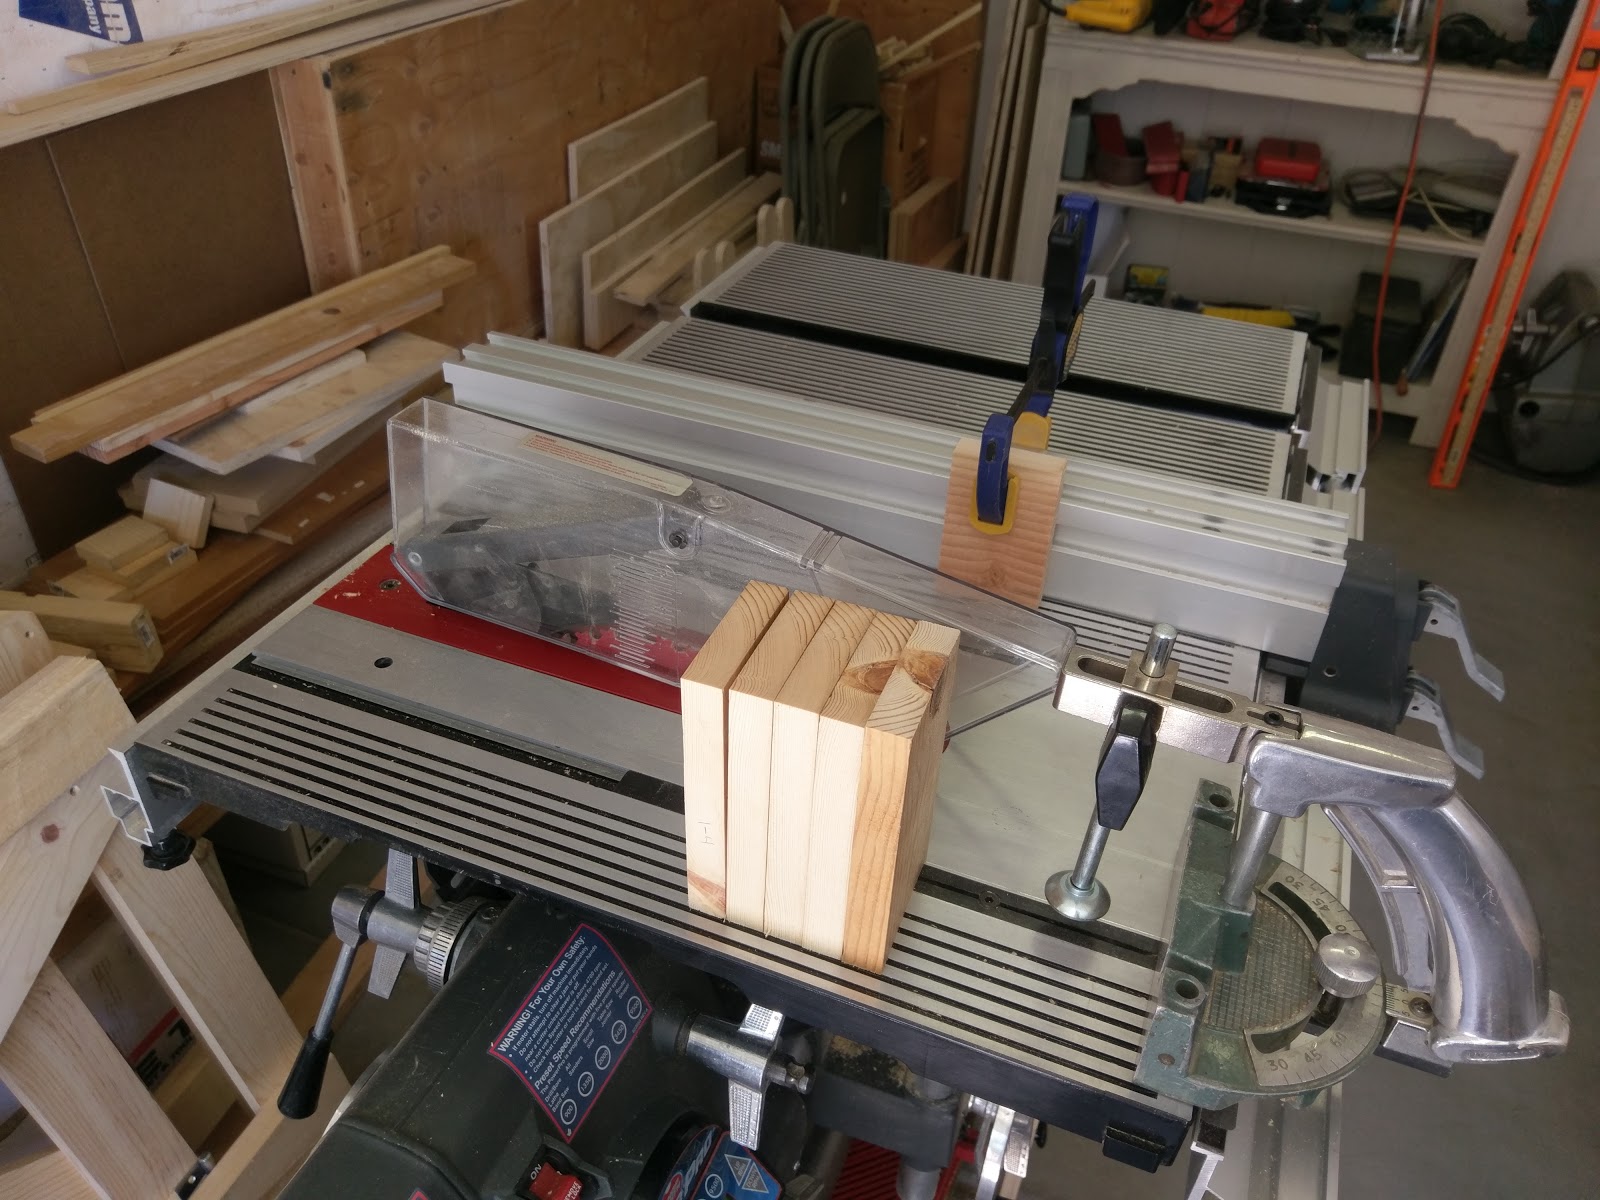
Assignment 4 demonstrates the process for cutting multiple pieces to the same length.  This is a necessary skill for many projects, and one of the few times that the fence will be used in conjunction with the miter gauge for through cuts.

This is not normally safe!
In order to avoid crosscut stock from binding against the fence and causing a dangerous kickback, a stop block is used to provide some clearance.  This is clamped to the fence on the infeed side of the blade, far enough back that the stock will have cleared the block before it has passed far enough through the cut to separate.  This assignment uses a 3/4" thick piece of lumber that is 3" wide and 30" long.  The stop block is clamped to the fence so that it's trailing end is about 1" forward of the leading edge of the blade.

Stop block clamped to fence

Fence assembly set 5.5" from inside tooth of saw (measured to the block)
Make a cut in a scrap piece of stock to check length, and make any necessary adjustments to the fence assembly.  Using the actual stock in the miter gauge, butt the piece gently against the block, and make the first cut.  Return to the starting position, and repeat.  Do this until your stock is not long enough to be completely supported across the face of your miter gauge.

Making first cut

It is the proper length!

Continue making cuts

At end of cut, pull stock away from blade, and return to starting position

One more cut
To cut this last section to length, use a previously cut piece laid on top to mark a cut line, then proceed as with a normal crosscut.

Guide piece

Mark it up!

Line it up, make the cut

Equality is fun!

More advanced techniques with the table saw configuration
Rabbets (or rebates if you're in the UK), are grooves running along either the end or the edge of a piece of stock, and provide a lot of glue surface for strong joinery.  This is a very important technique to know how to perform properly.  This assignment uses a 3/4" thick lumber, 3" wide and 30" long.  The edge rabbet is 3/8"x3/8" while the end rabbet is 3/4"x1/2".  Two different techniques are demonstrated.

To make the edge rabbet, first set the table so the blade extends 3/8".  Move the fence so that it is located 3/8" from the outside tooth of the blade.  Press the edge of the stock firmly against the fence, and make the cut.  Since this is not a through cut, the upper saw guard must be removed, so take extra precautions to keep your hands away from the blade.  To quote Matt Vanderlist, "Fingers and thumb, don't be dumb!"  Power off the machine, move the fence so that it is located 3/8" from the inside tooth of the blade.  Press the uncut face of the stock firmly against the fence, and make the cut.  This will remove a thin section of wood from the edge of your stock on the outside of the blade, so you should be safe from dangerous kickback, but stay out of the way to be safe.

I use a combination square for setting blade height and close-to-the-blade fence placement

Setting blade height

Setting fence position for first cut.  Measured from outside tooth of blade.

Make first cut in face of stock.  No guards, so be careful.

Fence adjusted, uncut face against fence.

What a pretty rabbet!
To make the end rabbet, I used this same piece, and used the uncut edge against the miter gauge.  The assignment called for a fresh piece of lumber, but I didn't see a good reason to cut of another piece of stock.  Table height was adjusted to 1/2" and fence was set at 3/4" from outside tooth of saw.  Holding the stock in the miter gauge, and butted against the fence the first cut was made.  The stock was then moved over the thickness of the blade (in my case I shifted the stock to the left, but it depends on which side of the blade your fence is on), and another cut was made.  Lather, rinse, repeat until the edge of the stock is reached.

Blade height

Fence and stock in position, held firmly against miter gauge.

Start of second cut

Repeat until all waste wood is cleared out.
I'm beginning to feel a bit more comfortable with these sawing techniques, but I made sure to practice both methods of making rabbets several times.  I think I'll get the hang of this!  More assignments on technique coming soon!

Part 2 and Part 3 now available!